

GitHub: https://github.com/six2dez/reconftw
Last Commit: September 5th, 2024

reconFTW automates the entire process of reconnaissance for you. It outperforms the work of subdomain enumeration along with various vulnerability checks and obtaining maximum information about your target.
reconFTW uses a lot of techniques (passive, bruteforce, permutations, certificate transparency, source code scraping, analytics, DNS records...) for subdomain enumeration which helps you to get the maximum and the most interesting subdomains so that you be ahead of the competition.
It also performs various vulnerability checks like XSS, Open Redirects, SSRF, CRLF, LFI, SQLi, SSL tests, SSTI, DNS zone transfers, and much more. Along with these, it performs OSINT techniques, directory fuzzing, dorking, ports scanning, screenshots, nuclei scan on your target.
So, what are you waiting for? Go! Go! Go! 💥
📔 Table of Contents
- ⚙️ Config file
- Usage
- TARGET OPTIONS
- MODE OPTIONS
- GENERAL OPTIONS
- Example Usage
- To perform a full recon on single target
- To perform a full recon on a list of targets
- Perform full recon with more time intense tasks (VPS intended only)
- Perform recon in a multi domain target
- Perform recon with axiom integration
- Perform all steps (whole recon + all attacks) a.k.a. YOLO mode
- Show help section
- Axiom Support ☁️
- Sample video
- 🔥 Features 🔥
💿 Installation
a) Using a PC/VPS/VM
You can check out our wiki for the installation guide Installation Guide 📖
- Requires Golang > 1.15.0+ installed and paths correctly set ($GOPATH, $GOROOT)
Important: if you are not running reconftw as root, run sudo echo "${USERNAME} ALL=(ALL:ALL) NOPASSWD: ALL" | sudo tee -a /etc/sudoers.d/reconFTW, to make sure no sudo prompts are required to run the tool and to avoid any permission issues.
git clone https://github.com/six2dez/reconftw
cd reconftw/
./install.sh
./reconftw.sh -d target.com -r
b) Docker Image 🐳 (3 options)
- Pull the image
docker pull six2dez/reconftw:main
- Run the container
docker run -it --rm \
-v "${PWD}/OutputFolder/":'/reconftw/Recon/' \
six2dez/reconftw:main -d example.com -r
- View results (they're NOT in the Docker container)
- As the folder you cloned earlier (named
reconftw) is being renamed toOutputFolder, you'll have to go to that folder to view results.
- As the folder you cloned earlier (named
If you wish to:
- Dynamically modify the behaviour & function of the image
- Build your own container
- Build an Axiom Controller on top of the official image
Please refer to the Docker documentation.
c) Terraform + Ansible
Yes! reconFTW can also be easily deployed with Terraform and Ansible to AWS, if you want to know how to do it, you can check the guide here
⚙️ Config file
You can find a detailed explanation of the configuration file here 📖
- Through
reconftw.cfgfile the whole execution of the tool can be controlled. - Hunters can set various scanning modes, execution preferences, tools, config files, APIs/TOKENS, personalized wordlists and much more.
👉 Click here to view default config file 👈
Usage
Check out the wiki section to know which flag performs what all steps/attacks Usage Guide 📖
TARGET OPTIONS
| Flag | Description |
|---|---|
| -d | Single Target domain (example.com) |
| -l | List of targets (one per line) |
| -m | Multiple domain target (companyName) |
| -x | Exclude subdomains list (Out Of Scope) |
| -i | Include subdomains list (In Scope) |
MODE OPTIONS
| Flag | Description |
|---|---|
| -r | Recon - Full recon process (without attacks like sqli,ssrf,xss,ssti,lfi etc.) |
| -s | Subdomains - Perform only subdomain enumeration, web probing, subdomain takeovers |
| -p | Passive - Perform only passive steps |
| -a | All - Perform whole recon and all active attacks |
| -w | Web - Perform only vulnerability checks/attacks on particular target |
| -n | OSINT - Performs an OSINT scan (no subdomain enumeration and attacks) |
| -c | Custom - Launches specific function against target |
| -h | Help - Show this help menu |
GENERAL OPTIONS
| Flag | Description |
|---|---|
| --deep | Deep scan (Enable some slow options for deeper scan, vps intended mode) |
| -f | Custom config file path |
| -o | Output directory |
| -v | Axiom distributed VPS |
| -q | Rate limit in requests per second |
Example Usage
NOTE: this is applicable when you've installed reconFTW on the host (e.g. VM/VPS/cloud) and not in a Docker container.
To perform a full recon on single target
./reconftw.sh -d target.com -r
To perform a full recon on a list of targets
./reconftw.sh -l sites.txt -r -o /output/directory/
Perform full recon with more time intense tasks (VPS intended only)
./reconftw.sh -d target.com -r --deep -o /output/directory/
Perform recon in a multi domain target
./reconftw.sh -m company -l domains_list.txt -r
Perform recon with axiom integration
./reconftw.sh -d target.com -r -v
Perform all steps (whole recon + all attacks) a.k.a. YOLO mode
./reconftw.sh -d target.com -a
Show help section
Axiom Support ☁️

Check out the wiki section for more info Axiom Support
- As reconFTW actively hits the target with a lot of web traffic, hence there was a need to move to Axiom distributing the work load among various instances leading to reduction of execution time.
- During the configuration of axiom you need to select
reconftwas provisoner. - You can create your own axiom's fleet before running reconFTW or let reconFTW to create and destroy it automatically just modifying reconftw.cfg file.
Sample video
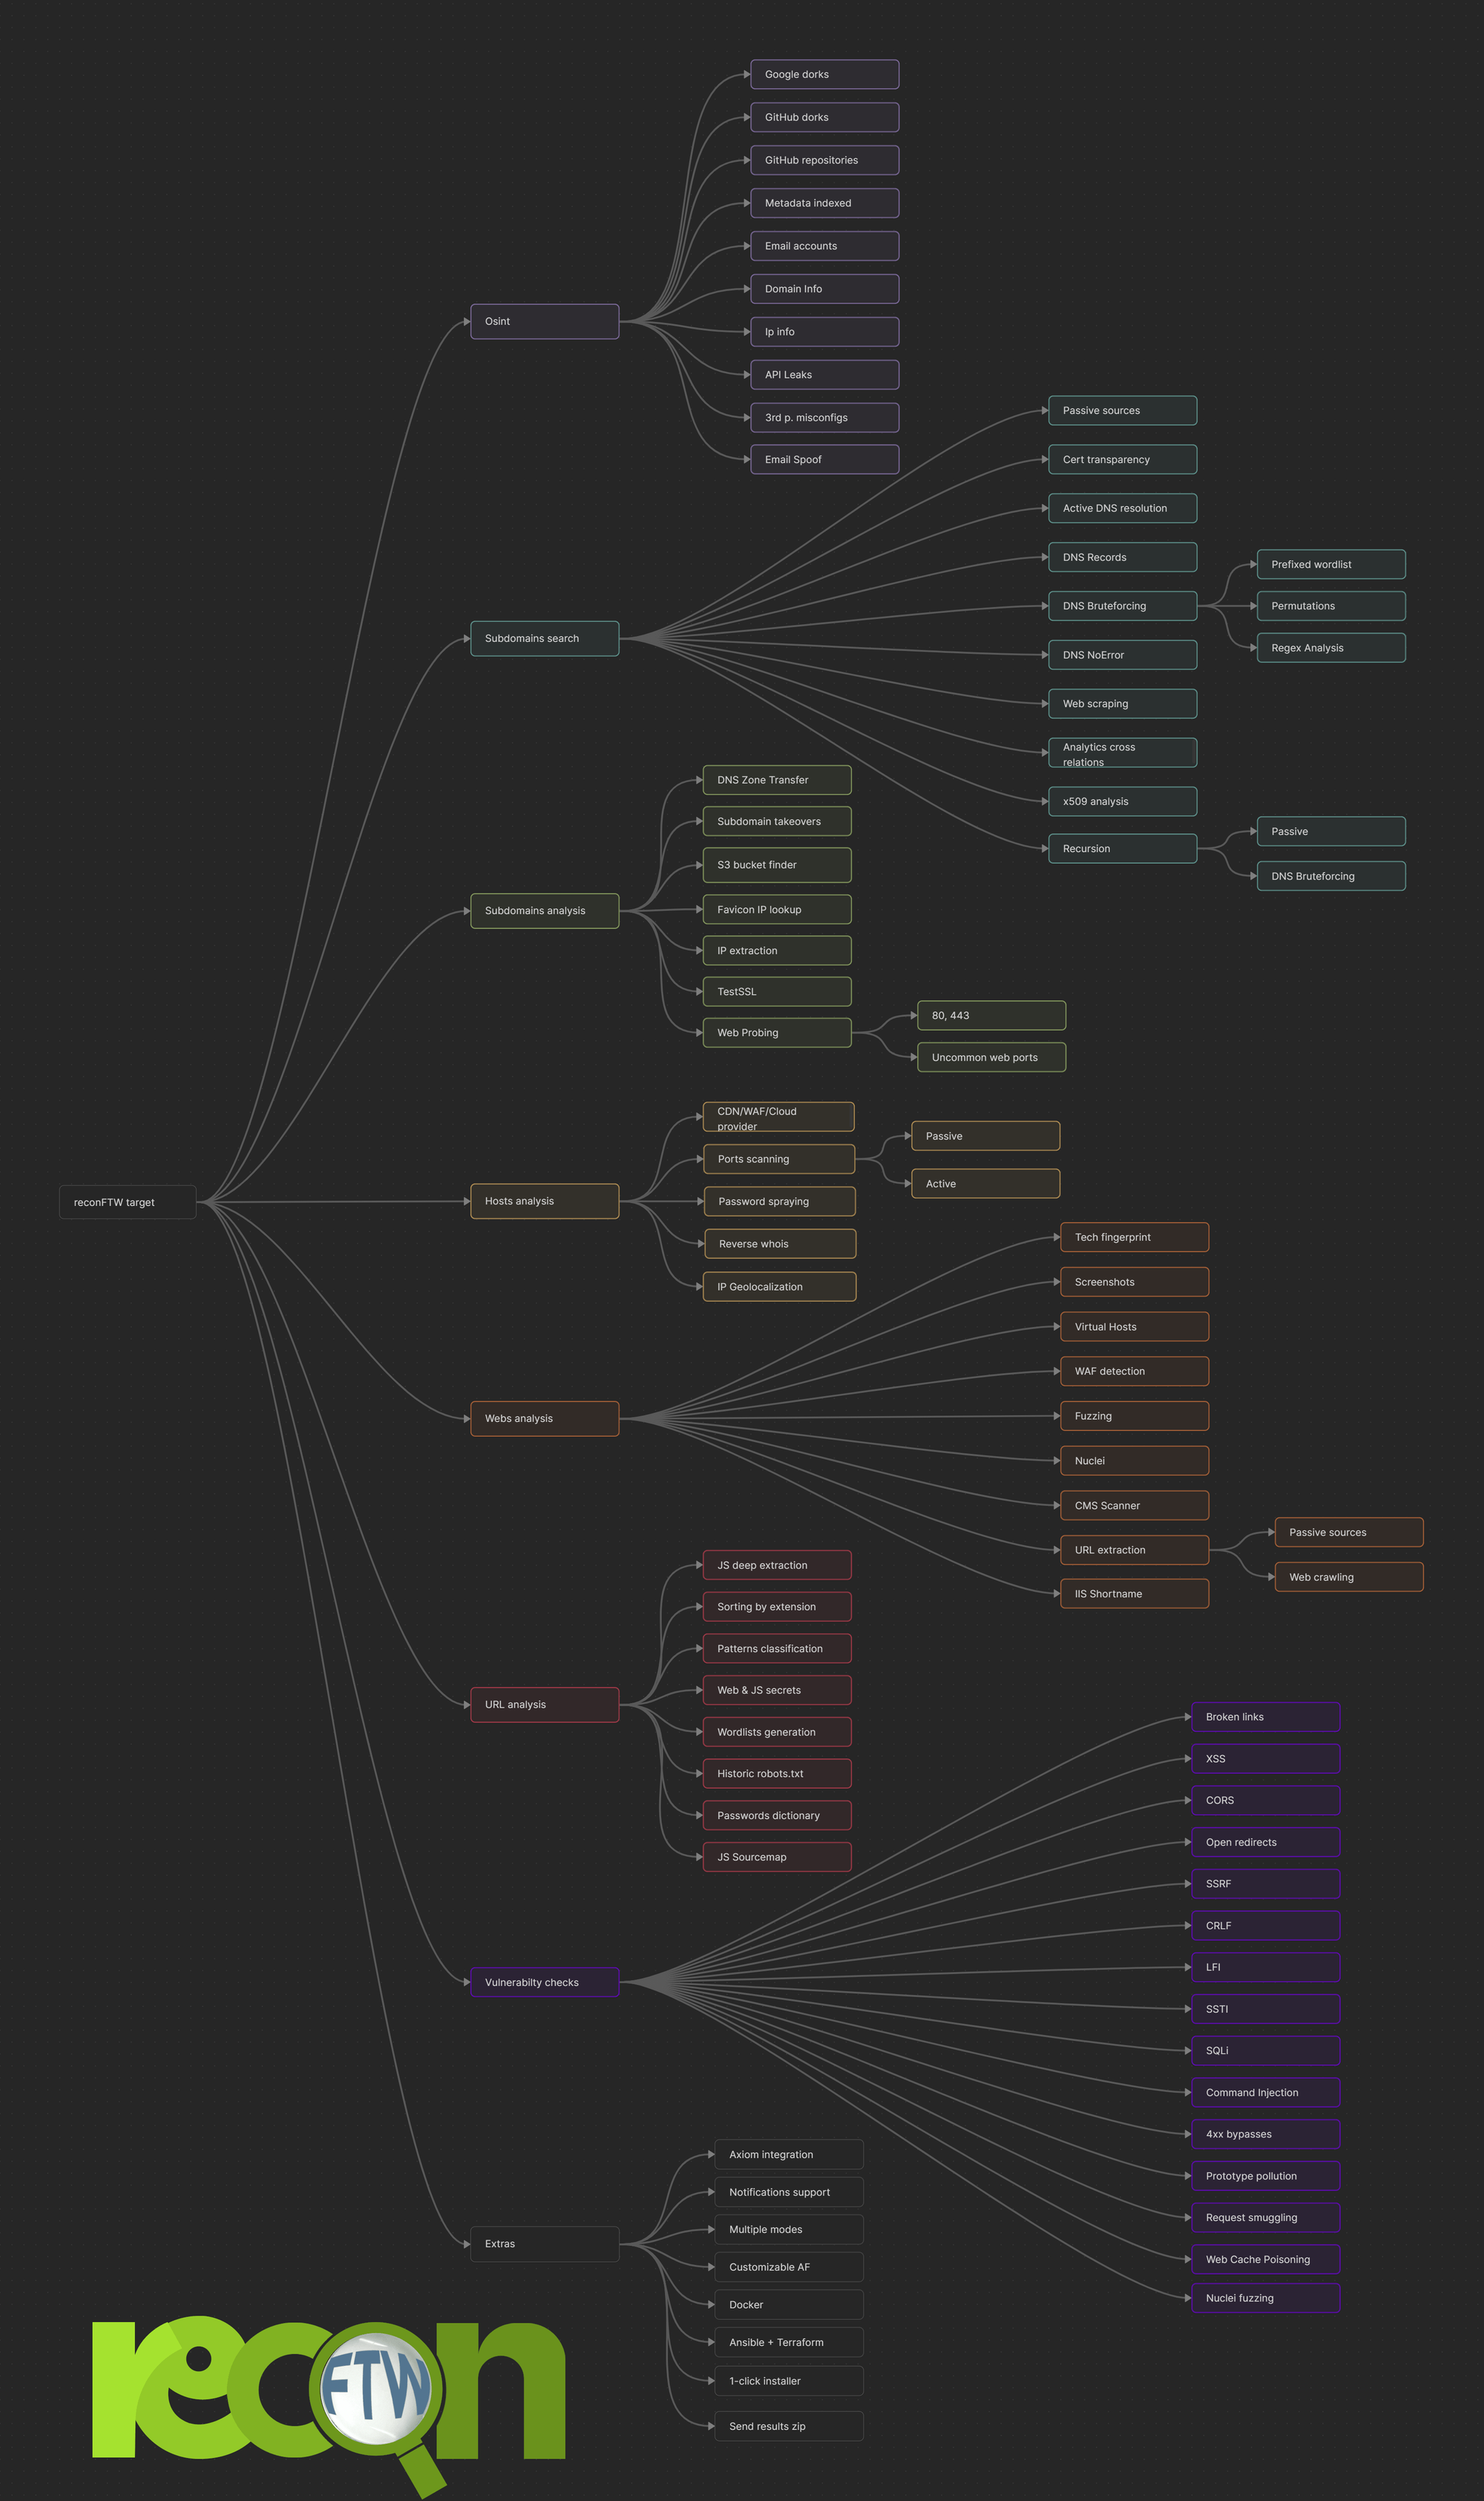
🔥 Features 🔥
Osint
- Domain information (whois)
- Emails addresses and passwords leaks (emailfinder and LeakSearch)
- Metadata finder (MetaFinder)
- API leaks search (porch-pirate and SwaggerSpy)
- Google Dorks (dorks_hunter)
- Github Dorks (gitdorks_go)
- GitHub org analysis (enumerepo, trufflehog and gitleaks)
- 3rd parties misconfigurations(misconfig-mapper)
- Spoofable domains (spoofcheck)
Subdomains
- Passive (subfinder and github-subdomains)
- Certificate transparency (crt)
- NOERROR subdomain discovery (dnsx, more info here)
- Bruteforce (puredns)
- Permutations (Gotator, ripgen and regulator)
- JS files & Source Code Scraping (katana)
- DNS Records (dnsx)
- Google Analytics ID (AnalyticsRelationships)
- TLS handshake (tlsx)
- Recursive search (dsieve).
- Subdomains takeover (nuclei)
- DNS takeover (dnstake)
- DNS Zone Transfer (dig)
- Cloud checkers (S3Scanner and cloud_enum)
Hosts
- IP info (whoisxmlapi API)
- CDN checker (ipcdn)
- WAF checker (wafw00f)
- Port Scanner (Active with nmap and passive with smap)
- Port services vulnerability checks (vulners)
- Password spraying (brutespray)
- Geolocalization info (ipapi.co)
Webs
- Web Prober (httpx)
- Web screenshoting (nuclei)
- Web templates scanner (nuclei and nuclei geeknik)
- CMS Scanner (CMSeeK)
- Url extraction (gau,waymore, katana, github-endpoints and JSA)
- URL patterns Search and filtering (urless, gf and gf-patterns)
- Favicon Real IP (fav-up)
- Javascript analysis (subjs, JSA, xnLinkFinder, getjswords, mantra, jsluice)
- Sourcemap JS extraction (sourcemapper)
- Fuzzing (ffuf)
- URL sorting by extension
- Wordlist generation
- Passwords dictionary creation (pydictor)
Vulnerability checks
- XSS (dalfox)
- Open redirect (Oralyzer)
- SSRF (headers interactsh and param values with ffuf)
- CRLF (crlfuzz)
- Cors (Corsy)
- LFI Checks (ffuf)
- SQLi Check (SQLMap and ghauri)
- SSTI (ffuf)
- SSL tests (testssl)
- Broken Links Checker (katana)
- Prototype Pollution (ppmap)
- Web Cache Vulnerabilities (Web-Cache-Vulnerability-Scanner)
- 4XX Bypasser (nomore403)
Extras
- Multithreading (Interlace)
- Custom resolvers generated list (dnsvalidator)
- Docker container included and DockerHub integration
- Ansible + Terraform deployment over AWS
- Allows IP/CIDR as target
- Resume the scan from last performed step
- Custom output folder option
- All in one installer/updater script compatible with most distros
- Diff support for continuous running (cron mode)
- Support for targets with multiple domains
- Raspberry Pi/ARM support
- 6 modes (recon, passive, subdomains, web, osint and all)
- Out of Scope Support + optional inscope support
- Notification system with Slack, Discord and Telegram (notify) and sending zipped results support
Mindmap/Workflow
Data Keep
Follow these simple steps to end up with a private repository with your API Keys and /Recon data.
Makefile
A Makefile is provided to quickly bootstrap a private repo. To use it, you'll need the Github CLI installed.
Once done, just run:
# below line is optional, the default is ~/reconftw-data
export PRIV_REPO="$HOME/reconftw-data"
make bootstrap
To sync your private repo with upstream:
make sync
To upload juicy recon data:
make upload
Manual
- Create a private blank repository on
Git(Hub|Lab)(Take into account size limits regarding Recon data upload) - Clone your project:
git clone https://gitlab.com/example/reconftw-data - Get inside the cloned repository:
cd reconftw-data - Create a new branch with an empty commit:
git commit --allow-empty -m "Empty commit" - Add the official repo as a new remote:
git remote add upstream https://github.com/six2dez/reconftw(upstreamis an example) - Update upstream's repo:
git fetch upstream - Rebase current branch with the official one:
git rebase upstream/main master
Main commands
- Upload changes to your personal repo:
git add . && git commit -m "Data upload" && git push origin master - Update tool anytime:
git fetch upstream && git rebase upstream/main master
How to contribute
If you want to contribute to this project, you can do it in multiple ways:
- Submitting an issue because you have found a bug or you have any suggestion or request.
- Making a Pull Request from dev branch because you want to improve the code or add something to the script.
Need help? ℹ️
- Take a look at the wiki section.
- Check FAQ for commonly asked questions.
- Join our Discord server
- Ask for help in the Telegram group


