GitHub: https://github.com/hueristiq/xurlfind3r
Last Commit: October 20th, 2024
xurlfind3r is a command-line utility designed to discover URLs for a given domain in a simple, efficient way. It works by gathering information from a variety of passive sources, meaning it doesn't interact directly with the target but instead gathers data that is already publicly available. This makes xurlfind3r a powerful tool for security researchers, IT professionals, and anyone looking to gain insights into the URLs associated with a domain.
Resource
Features
- Fetches URLs from multiple online passive sources to provide extensive results
- Supports
stdinandstdoutfor easy integration in automated workflows - Cross-Platform (Windows, Linux, and macOS)
Installation
Install release binaries (Without Go Installed)
Visit the releases page and find the appropriate archive for your operating system and architecture. Download the archive from your browser or copy its URL and retrieve it with wget or curl:
- ...with
wget: wget https://github.com/hueristiq/xurlfind3r/releases/download/v<version>/xurlfind3r-<version>-linux-amd64.tar.gz - ...or, with
curl: curl -OL https://github.com/hueristiq/xurlfind3r/releases/download/v<version>/xurlfind3r-<version>-linux-amd64.tar.gz
...then, extract the binary:
tar xf xurlfind3r-<version>-linux-amd64.tar.gz
Tip
The above steps, download and extract, can be combined into a single step with this onliner
curl -sL https://github.com/hueristiq/xurlfind3r/releases/download/v<version>/xurlfind3r-<version>-linux-amd64.tar.gz | tar -xzv
Note
On Windows systems, you should be able to double-click the zip archive to extract the xurlfind3r executable.
...move the xurlfind3r binary to somewhere in your PATH. For example, on GNU/Linux and OS X systems:
sudo mv xurlfind3r /usr/local/bin/
Note
Windows users can follow How to: Add Tool Locations to the PATH Environment Variable in order to add xurlfind3r to their PATH.
Install source (With Go Installed)
Before you install from source, you need to make sure that Go is installed on your system. You can install Go by following the official instructions for your operating system. For this, we will assume that Go is already installed.
go install ...
go install -v github.com/hueristiq/xurlfind3r/cmd/xurlfind3r@latest
go build ... the development Version
- Clone the repository git clone https://github.com/hueristiq/xurlfind3r.git
- Build the utility cd xurlfind3r/cmd/xurlfind3r && \
go build . - Move the
xurlfind3rbinary to somewhere in yourPATH. For example, on GNU/Linux and OS X systems: sudo mv xurlfind3r /usr/local/bin/Windows users can follow How to: Add Tool Locations to the PATH Environment Variable in order to addxurlfind3rto theirPATH.
Caution
While the development version is a good way to take a peek at xurlfind3r's latest features before they get released, be aware that it may have bugs. Officially released versions will generally be more stable.
Install on Docker (With Docker Installed)
To install xurlfind3r on docker:
- Pull the docker image using:docker pull hueristiq/xurlfind3r:latest
- Run
xurlfind3rusing the image:docker run --rm hueristiq/xurlfind3r:latest -h
Post Installation
xurlfind3r will work right after installation. However, some sources require API keys to work. These keys can be added to a configuration file at $HOME/.config/xurlfind3r/config.yaml, created upon first run, or set as environment variables.
Example of environment variables for API keys:
XURLFIND3R_KEYS_BEVIGIL=your_bevigil_key
XURLFIND3R_KEYS_ONTELX=your_intelx_key
Usage
To start using xurlfind3r, open your terminal and run the following command for a list of options:
xurlfind3r -h
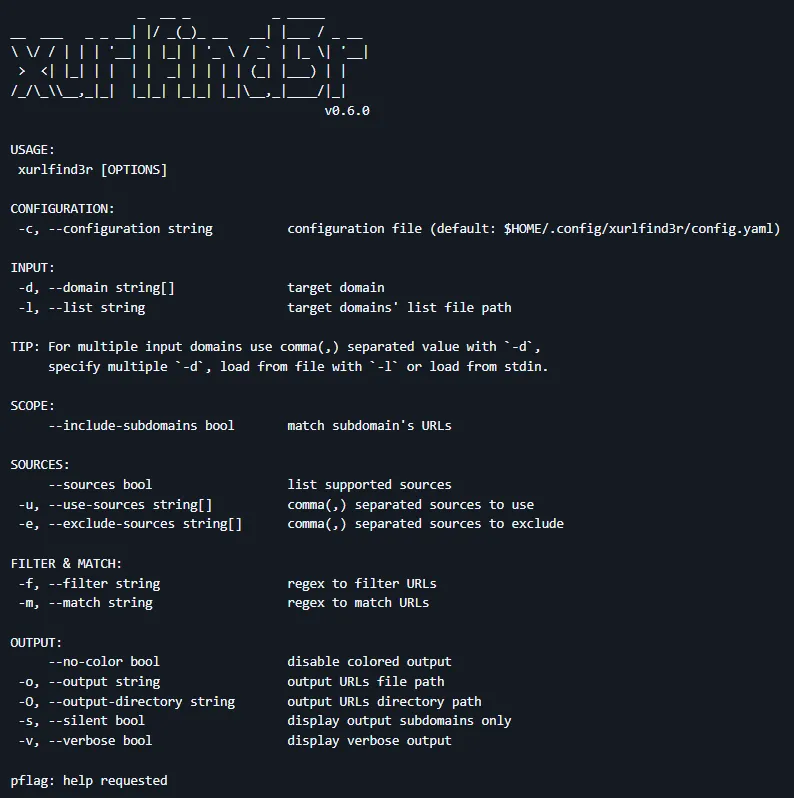
Here's what the help message looks like:
                 _  __ _           _ _____
__  ___   _ _ __| |/ _(_)_ __   __| |___ / _ __
\ \/ / | | | '__| | |_| | '_ \ / _` | |_ \| '__|
 >  <| |_| | |  | |  _| | | | | (_| |___) | |
/_/\_\\__,_|_|  |_|_| |_|_| |_|\__,_|____/|_|
                                          v0.6.0

USAGE:
 xurlfind3r [OPTIONS]

CONFIGURATION:
 -c, --configuration string          configuration file (default: $HOME/.config/xurlfind3r/config.yaml)

INPUT:
 -d, --domain string[]               target domain
 -l, --list string                   target domains' list file path

TIP: For multiple input domains use comma(,) separated value with `-d`,
     specify multiple `-d`, load from file with `-l` or load from stdin.

SCOPE:
     --include-subdomains bool       match subdomain's URLs

SOURCES:
     --sources bool                  list supported sources
 -u, --use-sources string[]          comma(,) separated sources to use
 -e, --exclude-sources string[]      comma(,) separated sources to exclude

FILTER & MATCH:
 -f, --filter string                 regex to filter URLs
 -m, --match string                  regex to match URLs

OUTPUT:
     --no-color bool                 disable colored output
 -o, --output string                 output URLs file path
 -O, --output-directory string       output URLs directory path
 -s, --silent bool                   display output subdomains only
 -v, --verbose bool                  display verbose output

pflag: help requested
Examples
Basic
xurlfind3r -d hackerone.com --include-subdomains
Filter Regex
# filter images
xurlfind3r -d hackerone.com --include-subdomains -f '`^https?://[^/]*?/.*\.(jpg|jpeg|png|gif|bmp)(\?[^\s]*)?$`'
Match Regex
# match js URLs
xurlfind3r -d hackerone.com --include-subdomains -m '^https?://[^/]*?/.*\.js(\?[^\s]*)?$'

